The links below serve as a starting point for building access, forms and IT support.
Email Dalton’s IT staff for any IT or building access issues or call 573-882-6348 to help us resolve your issue.
Dalton Resource Access
Request access to Dalton resources
For individuals wanting one or more of the following:
- Unattended access to the Dalton building or lab
- Visiting Dalton longer than a week
- Utilize a Dalton resource secured by key or ID Card
- Utilize a Dalton resource that requires authentication:
- Computer logon
- Calendar reservation
- File, print, application or web access
- Email list membership
… filling out the Dalton Building Personnel Form is required.
If a user requesting such access is not a registered MU Facutly, Staff or Student, they must obtain an MU Courtesy Appointment approved by the Dalton Director. Please see HR Office staff for more information.
A user MUST have an EmplID assigned by MU HR before a logon account can be obtained. Depending on how the user is titled or registered, Dalton IT may have to manually request account creation after an EmplID has been issued as opposed to being automatically generated.
For key and/or ID Card access, filling out the separate Dalton Building Access Form is required! However, before they can be issued, the user MUST be fully posted to MU HR Reporting system, which can take up-to 2 business days to synchronize after confirmation of HR Production system posting.
When requesting access to lab space assigned to another PI (i.e. not your current PI/Supervisor) you must get approval from both!
For any future changes to key or ID Card access for an existing registered user, filling a new Dalton Building Access form is required! Multiple changes per form is fine, but each set of changes requires a new form.
Although all forms require a signature of the sponsoring PI/Supervisor, resource manager and, in some cases, the Dalton Director, an Email from each signatory is an acceptable alternative. Emails approving new/changes to key or ID Card access must explicitly detail what changes are being approved.
All users must physically visit Dalton IT to finalize setup within the system, obtain keys or ID card access. Although someone is usually available in the office, setting up an appointment time is preferred.
Shared resources like microscopes, core equipment, etc. may require additional approval by the appointed manager in addition to a PI/Supervisor and require training. Please seek equipment manager approval prior to requesting acces from IT. Associated managers can be found on the main Calendars page (only currently personnel can access… requires logon).
Forms
Fill out the forms below to add personnel and for building access. To add a form to this page, email mu-dcrc-it-staff@missouri.edu.
Important links
- Dalton monitoring system – Login Required
- Email web access – MU Login Required
- Teams web access – MU Login Required
- Dalton Calendar Sharepoint Site – MU Login Required
Contact information
Dalton has two full-time IT staff available to help with computing, data and telecommunications needs. They support, streamline and enhance IT resources for the Dalton community. IT operates primarily during business hours, but Dalton support outside of those hours can be arranged on an on-call basis.
Although office walk-ins are welcome, if you have a time-sensitive issue, please make an appointment.
Dalton IT
- Dalton 115
- mu-dcrc-it-staff@missouri.edu
- Office – 573-882-3546
- On call – 573-884-5176
- John Donahue – Support Systems Administrator
- Adison Rooks – System Support Analyst
Secondary contact
Office administration staff are available in Dalton 134, Monday-Friday from 8 a.m.-5 p.m. (regular hours) and 7:30 a.m.- 4:30p.m. (Summer hours)
If IT staff are unavailable via email or the on-call number, contact a member of the office staff for assistance and/or it is an emergency.
Main phone number: 882-7588
mu-dcrc-office-staff-only@missouri.edu
Tertiary Contact
Phone: 573-882-5000
VPN access
This page will have our list of IT How To… articles. The list is sparse right now as the content needs to be translated from the old CMS to the current setup, however as they’re published, this page will be updated.
Mac tutorial – AnyConnect VPN Client
This tutorial is a walk through on connecting to the campus VPN system with the CISCO AnyConnect client OSX (10.7+). This system went into effect Sept. 2012 with the previous CISCO and Nortel systems and clients becoming obsolete later the same semester.
OSX has a CISCO IPSEC client built into it’s network options, but that is not compatible with the AnyConnect system. Older systems, 10.4 and lower, may actually had an app installed to Applications | CISCO. If you have this folder please trash it before proceeding.
1. Open a web browser and proceed to https://anyconnect.missouri.edu.
2. We recommend getting in the habit of selecting the *Employee from the dropdown and click the Login button.
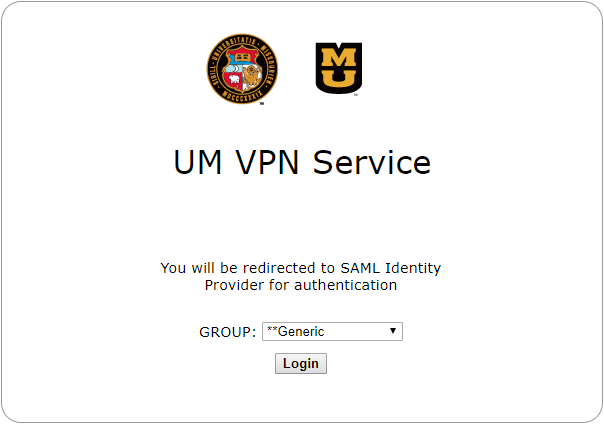
Currently, only faculty/staff and GRA’s can use the *Employee profile. Undergrad Students must use the *Generic which limits them to basic services that do not include DCRC, VetMed or any other TigerNet2 resources. However, in this web interface, some faculty/staff have had to use *Generic option to get login to succeed to access the client install download.
3. You will be redirected to MU Microsoft Authentication page where you must enter you ID in the format of sso@umsystem.edu and MU Password. Enter the digit corresponding with the method to receive your response code, or the code if you already have it at hand.
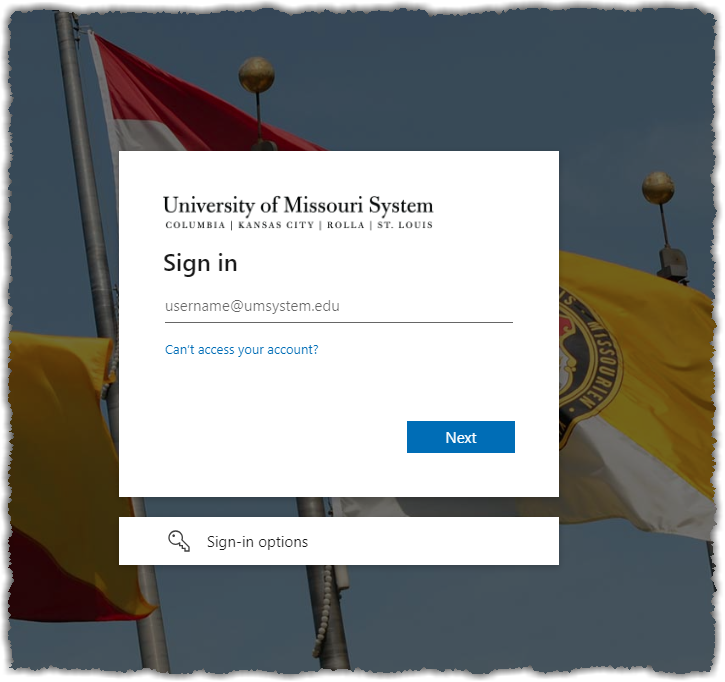
Once logged in, you will have ~60seconds to complete the download process before your session will be kicked!!
4. If you have not used MFA on this browser, checked the Don’t ask again for 30 days, cleared your browser’s cache and/or its been longer than 30days, you will be prompted for your 2Factor code.
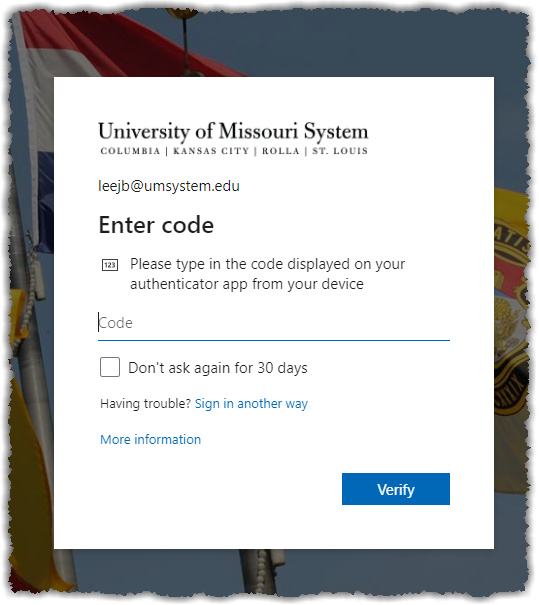
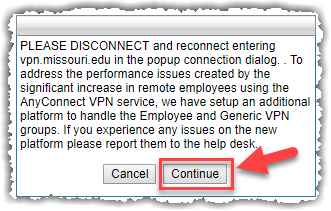
5. You may receive a prompt asking you to disconnect, you must IGNORE this and click the Continue button.
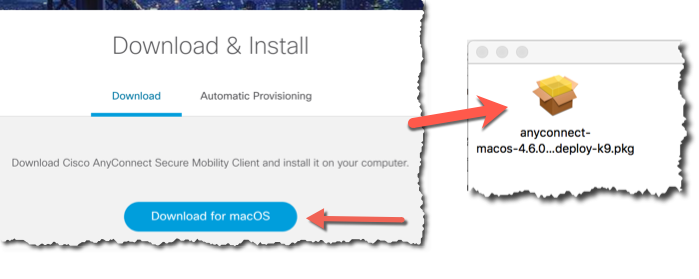
6. You will be presented with a download link. Click the download button and save the .dmg file. It will extract and you can double-click the .pkg file that appears to start the install.
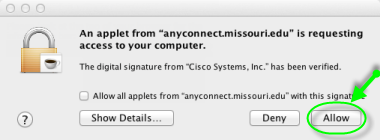
7. You will be presented with a Wizard. You may see multiple confirmation popups asking you to allow an applet, do…
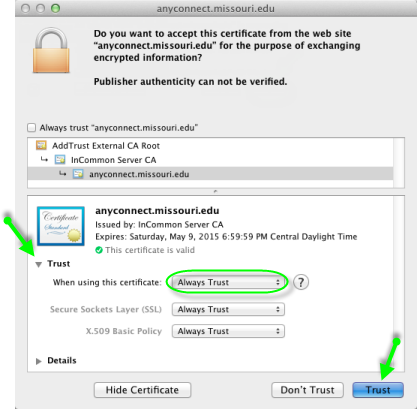
… and to trust a certificate, do as well, but its best to expand the Trust section, set the first dropdown to Always Trust and then click Trust.
8. Click the AnyConnect icon in the lower right and the connect dialog will appear. If the field is blank or has the old address, enter vpn.missouri.edu, then click Connect.
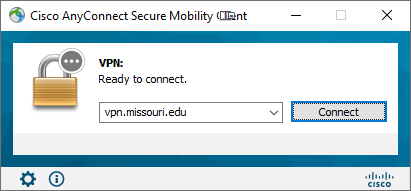
As of March 30th 2020, all Faculty/Staff using the *Employee vpn group MUST use the VPN.MISSOURI.EDU server address when connecting. This is different than the url to download and install the client.
9. Two popups will occur… one allowing you to select which VPN group, this must be set to *Employee BEFORE you login.
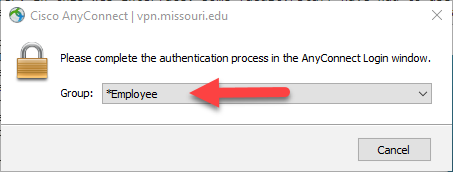
The second will be, as in step three above, a prompt for your @umsystem.edu formatted ID, password and possibly your 2Factor code.
The group selection popup often is hidden behind the Login popup. You may have to move or minimize the login screen to see the group selection and again MUST set the proper group BEFORE you complete the login process. Once you set, the next time you connect it should remember the previous selection.
If there is an update to the client, it may install here. Wait till completed.
10. If successful, you should see the AnyConnect icon with a yellow padlock on the menu bar in the upper right.

If you do not see the icon on the menu bar or have quit the AnyConnect client and wish to start it, simply go to Applications | CISCO and click the AnyConnect app.
his tutorial is a walk through on connecting to the campus VPN system with the CISCO AnyConnect client for Windows (64bit). This system went into effect Sept. 2012 with the previous CISCO and Nortel systems and clients becoming obsolete later the same semester.
You must have Administrator rights to install the AnyConnect client.
Uninstall previous CISCO or Nortel VPN clients before proceeding, especially if you have come to MU from another organization that used VPN client. To check, click Start | Control Panel | Add/Remove Programs (XP) or Programs and Features. You will be presented with a list of software, sometimes it can take a while to populate. Scroll down and look for Nortel or CISCO VPN client. If found, highlight them and click Uninstall. A reboot may be required, pay attention to messages.
In April of 2018, two-factor authentication was added to the VPN client process and then in 2021 that was switched up to the latest Microsoft MFA solution. For more info please see the Microsoft 365 Login Info page or contact your dept. IT.
1. Open a web browser and proceed to https://anyconnect.missouri.edu.
2. We recommend getting in the habit of selecting the *Employee from the dropdown and click the Login button.
Currently, only faculty/staff and GRA’s can use the *Employee profile. Undergrad Students must use the *Generic which limits them to basic services that do not include DCRC, VetMed or any other TigerNet2 resources. However, in this web interface, some faculty/staff have had to use *Generic option to get login to succeed to access the client install download.
3. You will be redirected to MU Microsoft Authentication page where you must enter you ID in the format of sso@umsystem.edu and MU Password. Enter the digit corresponding with the method to receive your response code, or the code if you already have it at hand.
Once logged in, you will have ~60seconds to complete the download process before your session will be kicked!!
4. If you have not used MFA on this browser, checked the Don’t ask again for 30 days, cleared your browser’s cache and/or its been longer than 30days, you will be prompted for your 2Factor code.
5. You may receive a prompt asking you to disconnect, you must IGNORE this and click the Continue button.
6. You will be presented with a download button for the OS detected. Click to download the .exe installer file and once completed, browse to the downloads location (likely current user’s Downloads folder), and double-click on the installer following the directions presented taking all the defaults.
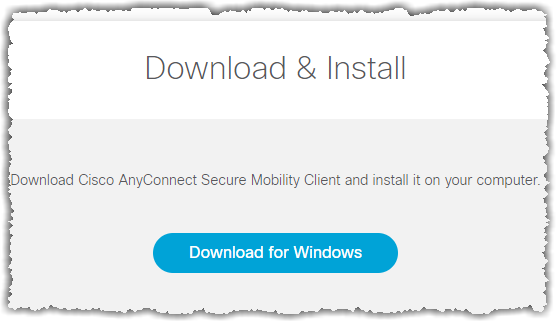
7. Once completed, if you don’t see the AnyConnect icon  in the system tray at the bottom right, click Start and scroll to CISCO and look for Cisco AnyConnect Secure Mobility Client and launch it.

8. Click the AnyConnect icon in the lower right and the connect dialog will appear. If the field is blank or has the old address, enter vpn.missouri.edu, then click Connect.
As of March 30th 2020, all Faculty/Staff using the *Employee vpn group MUST use the VPN.MISSOURI.EDU server address when connecting. This is different than the url to download and install the client.
9. Two popups will occur… one allowing you to select which VPN group, this must be set to *Employee BEFORE you login.
The second will be, as in step three above, a prompt for your @umsystem.edu formatted ID, password and possibly your 2Factor code.
The group selection popup often is hidden behind the Login popup. You may have to move or minimize the login screen to see the group selection and again MUST set the proper group BEFORE you complete the login process. Once you set, the next time you connect it should remember the previous selection.
If there is an update to the client, it may install here. Wait till completed.
10. Once connected, there will be a Windows Notification slide in from the bottom right indicated success.
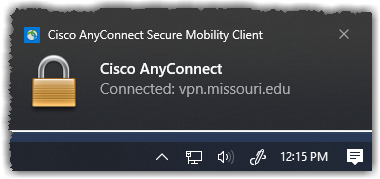
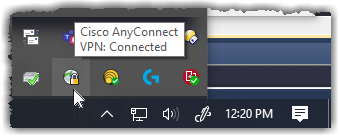
…or, you can click the System Tray where the CISCO icon should have a locked padlock on it and if you hover your cursor over should state status as Connected.